
Set Up Notices
Set up Notices for mailing
Remember to click on the images to enlarge the view.
In Reports, Notices select Setup. This will code all the parcels getting a notice with the Notice Date specified and the appropriate Notice Status on Value Summary.
- Notice Date: This date will be applied to the appropriate parcels.
- Residential or Commercial: You can select “All” property types, only “Residential” or only “Commercial” for the setup.
- Send Notices for Value Changes: When mailing notices for value increases only, you’ll need to uncheck the “Decrease” and “Unchanged” options.
- If you have a minimum appraised increase amount you’ll also need to enter the amount in the ‘Increase Amount:” field.
- Clear Status Prior to: This will clear the Notice Status code on the parcels being set up when the Notice Date is prior to the date specified. The date specified should be the most recent date used or the Notice Date in the setup.
- Subdivision: Used when only specific subdivisions will be sent a notice.
- Selection: Applies when Parcel Select was used to select specific parcels for the notice setup.
- Click on the OK button to run.
- When finished close the dialog.

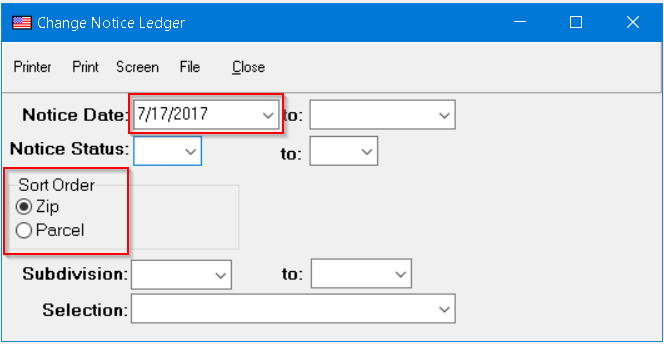
Go to Reports, Notices and select Ledger to run a report of the parcels set up to get a notice. Other than using this for editing purposes, this report should be archived and is useful to know which parcels were sent a notice, where it was sent and to whom and what the values were on the notice.
- Notice Date: Select the Notice Date from the Notice Setup.
- Notice Status: Select from the dropdown if looking for a specific Notice Status code. Leave blank if running on all notices with the date specified.
- Sort Order: Choose Zip for mailing order or to verify addresses. Choose Parcel to review.
- Subdivision: Used when only specific subdivisions will be sent a notice.
- Selection: Applies when Parcel Select was used to select specific parcels for the notice setup.
- Select your report destination to run.
- When finished close the dialog.
- Review the report for missing or incorrect mailing addresses, missing assessed values, etc.

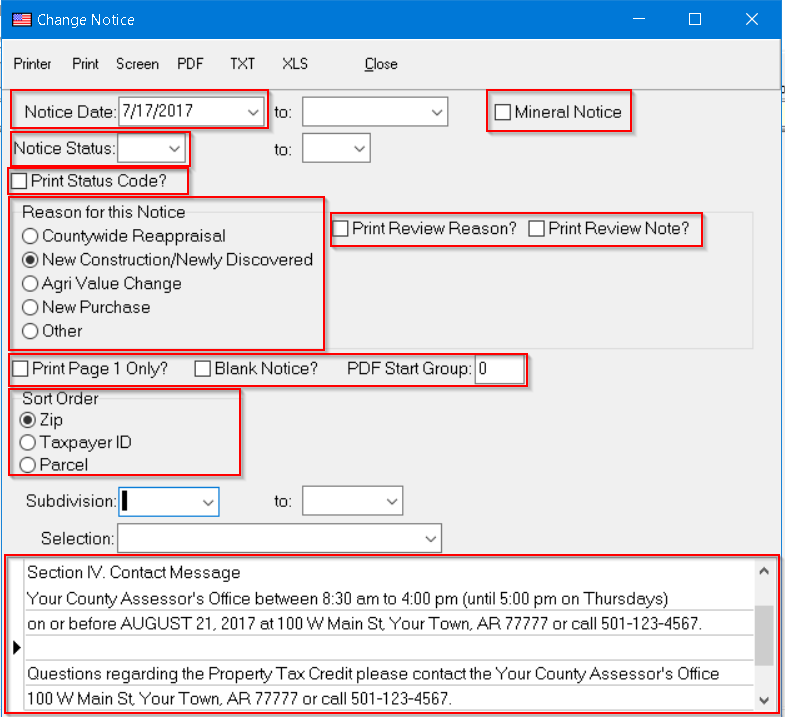
In Reports, Notices select Change Notice to run the notices to a Printer, Screen, a PDF file or a Text file.
- Notice Date: Use the Notice Date from the setup.
- Mineral Notice: Select when printing notices for mineral parcels.
- Notice Status: Use to select parcels with specific Notice Status codes. Leave blank if running on all notices with the date specified.
- Print Status Code?: Useful when the specific code’s description refers to the reason for the notice, such as “New Pool”, “Addition”, etc.
- Reason for this Notice: This will default to “New Construction/Newly Discovered”, except during the reappraisal year this will default to “Countywide Reappraisal”. When printing notices for another reason, select the appropriate option.
- Print Review Reason?: Useful when you select ‘Other’ in Reason for this Notice, listed above. The most recent Review Record for the current year is used.
- Print Review Notes?: Along with the Review Reason the Review Note provides addition information.
- Print Page 1 Only?: Useful when you pre-print the back page of the notice and want to print only the front page.
- Blank Notice?: Used to send to the Assessor, Appraisal Manager, ACD, etc. to review/approve the notice settings, such as the contact dates and phone numbers.
- PDF Start Group: The default start group when sending the notices to PDF is ‘0’. If you need to rerun a specific file in the group due to value changes
- Sort Order: Select the Sort Order option preferred.
- Zip will be helpful when sorting for printing and mailing from the office.
- Taxpayer ID is useful when combining multiple notices to the same person in a single envelope.
- Parcel is an additional option for sorting.
- Subdivision: Used when only specific subdivisions are to be sent a notice.
- Selection: Applies when Parcel Select was used to select specific parcels setup for a notice.
- Section IV. Contact Message: Enter the message you wish to print on all notices, including phone numbers, dates and times. This message will print on individual notices as well.
- Select your report destination at the top. If having the notices printed offsite refer to the vendor’s preference.
- When sending the notices to a PDF they will be created in files of 500 notices each (NOTICE_County_YearPDF, NOTICE_County_Year_001.PDF, etc.)
- When sending the notices to a TXT file the data is extracted to a formatted text file. This is used when the notice data is sent to an outsource provider that will print and/or mail the notices for you. A record layout of the data will be provided upon request.
Additional options are available when printing the notice form. In Tables, Allowables, Options these are:
- NotPBC – Print postal bar code – Y/N
- PNotAT – Print estimated Ad Valorem tax– Y/N
- PNotAY – Print Sect III assessment years– Y/N (Will always print on Countywide Reappraisal notices.)
- PNotET – Print estimated tax change– Y/N
- PNotHD – Print current year homestead year– Y/N (This is at the bottom on Section IV)
- PNotHS – Print homestead fields on all notices– Y/N (By default, they will print on parcels with homestead and improved non-commercial parcels)
- PNotMP – Print previous values on mineral notices– Y/N
- PNotRN – Print Review Record note– Y/N (This will check the option on the Change Notice dialog)
- PNotRR – Print Review Record reason– Y/N (This will check the option on the Change Notice dialog)
- PNOTTI – Print Taxpayer name and address for mailing – Y/N
Also, in Tables, Allowables, BOE this information should be verified for accuracy:
- 1 – Tel#: Phone number to call to schedule a hearing with the Board of Equalization
- 2 – Start: BOE begins regular session
- 3 – End: BOE ends regular session
- 4 – Appt: Last date to call to schedule a hearing with the BOE